When you install TrueNAS SCALE your NAS runs a Netdata. You can verify that by executing systemctl status netdata in the TrueNAS shell. I use Netdata to monitor my homelab and have a parent set up for long term metric storage. I’d love to configure the NAS to also push metrics to a parent, so that I can access them all from a single place.
Normally, if you want to set up streaming in Netdata it’s enough to edit /etc/netdata/stream.conf. However, I wouldn’t recommend doing this on a TrueNAS install for a couple of reasons. Firstly, this is not a recommended way of adjusting configuration and that is clearly evident when you open up the TrueNAS shell:
Warning: the supported mechanisms for making configuration changes
are the TrueNAS WebUI, CLI, and API exclusively. ALL OTHERS ARE
NOT SUPPORTED AND WILL RESULT IN UNDEFINED BEHAVIOR AND MAY
RESULT IN SYSTEM FAILURE.
Secondly, if you ignore these warnings and use the shell to adjust the configuration, you’ll still end up in a pickle. Trust me, I’ve tried. The Netdata version that comes preinstalled with TrueNAS SCALE(23.10.1.1) is v1.37.1. You can verify this by running curl localhost:6999/api/v1/info | grep version in the TrueNAS shell. This version is quite old, over a year old at the time of writing and seems to have bug in the streaming protocol. When I set it up to stream to my Netdata parent, the Netdata daemon in TrueNAS started crashlooping. This meant that no metrics were visible on the TrueNAS Web UI or being streamed to the parent.
At that point I realized I’d probably need to use the Netdata app on True NAS.
Configuring streaming to Netdata parent via the app
The good thing about this app is that it uses the Netdata helm chart under the hood, meaning new versions of Netdata are available. Simply install it from the available applications on the TrueNAS Web UI. As far as configuration goes, there is no need to configure anything.
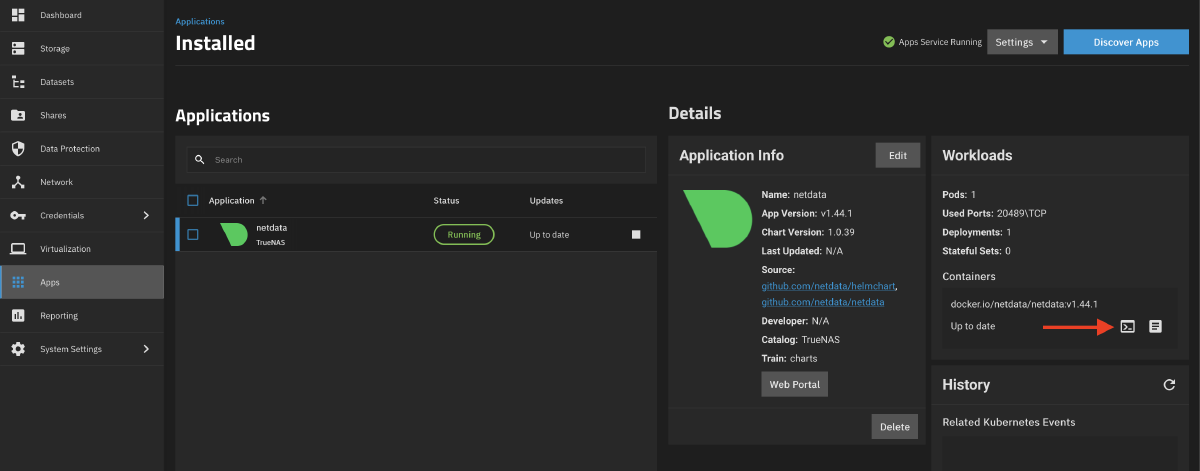
Once the app is installed and running, open up a shell by hitting the button on the app menu:
We’re now inside the Netdata container running inside of the kubernetes cluster running on your TrueNAS SCALE. Using your favorite text editor, open /etc/netdata/stream.conf and paste the following:
[stream]
  enabled = yes
  destination = 192.168.1.1:19999
  api key = 11111111-2222-3333-4444-555555555555
  timeout seconds = 60
  buffer size bytes = 1048576
  reconnect delay seconds = 5
  initial clock resync iterations = 60
Replace 192.168.1.1:19999 with the host and port of your Netdata parent and 11111111-2222-3333-4444-555555555555 with your Netdata streaming API key.
The next thing you’ll probably want to do is assign this node a proper hostname. By default, Netdata uses the hostname of machine it’s running on and since we’re on a pod in kubernetes you’ll get something catchy like netdata-5f9684f696-mdrhf. Luckily, we can fix that. I will also make a few general adjustments to the Netdata configuration, switching it to in memory mode as well as disable some auxiliary features as that will get handled by the parent. This makes the installation lightweight, consuming less resources of our NAS.
Open /etc/netdata/netdata.conf and paste the following:
[global]
  hostname = my-catchy-hostname
[db]
  mode = ram
[health]
  enabled = no
[ml]
  enabled = no
Exit the shell, stop and start the app again. You should now be able to see the new node on your Netdata parent.
Claiming to Netdata Cloud
If you don’t have a parent but would like to be able to access the metrics from Netdata Cloud it is possible to claim it using the same TrueNAS app. To do so, first grab a few things from the cloud. You’ll need the claim token, and the room ID. You can get them by hitting the Add nodes button in the Netdata Cloud. You’ll see something like this:
wget -O /tmp/netdata-kickstart.sh https://get.netdata.cloud/kickstart.sh && sh /tmp/netdata-kickstart.sh --nightly-channel --claim-token {your_token} --claim-rooms 89f01a07-697e-40ce-b90c-3ee0091a02b5 --claim-url https://app.netdata.cloud
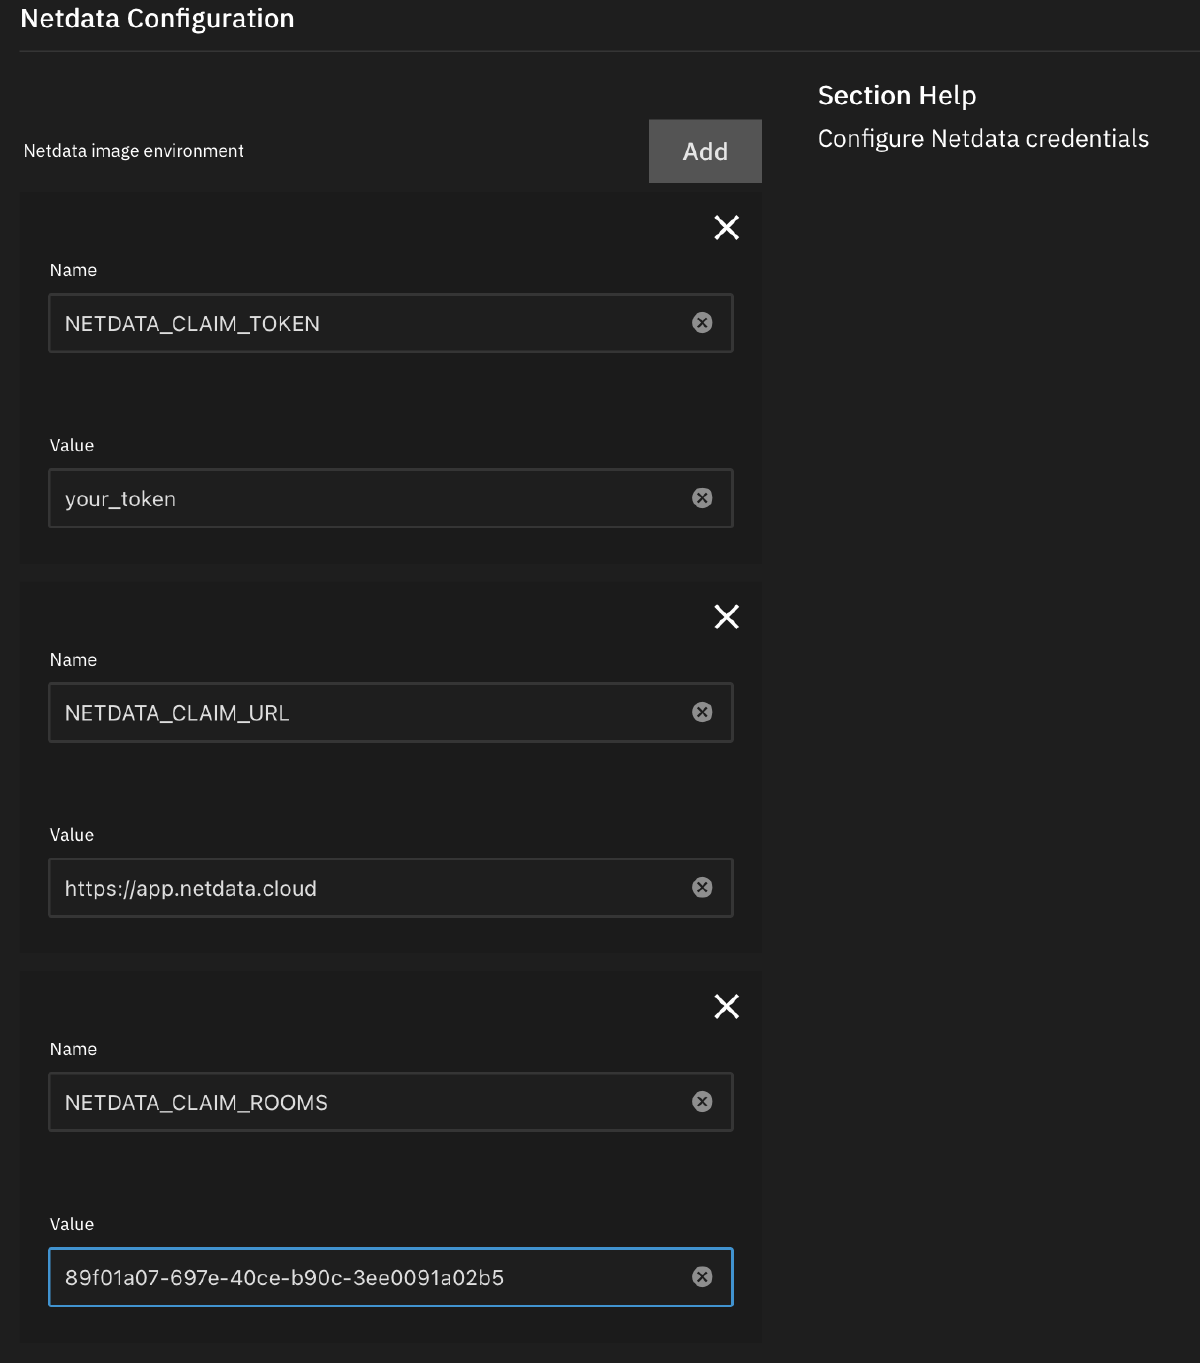
Next, head to the TrueNAS SCALE Web UI apps section, find and hit install on Netdata. However, this time some extra configuration is required. Under the Netdata Configuration you’ll want to add 3 environment variables:
NETDATA_CLAIM_TOKEN=your_token
NETDATA_CLAIM_URL=https://app.netdata.cloud
NETDATA_CLAIM_ROOMS=89f01a07-697e-40ce-b90c-3ee0091a02b5
After the installation is complete, you should see your node appear on Netdata cloud.
I hope this helps! If you’ve got any questions shoot them in the comments below.

